Using IncidentIQ for Tech, Facilities and Room Reservations
Accessing Incident IQ
Open a new tab and type support.etownschools.org
in the address bar and press Return on the keyboard.
Click Login with Google. Click on your district email address if it shows, or type it in and enter your password if you’re not already signed into your district Google account.
Start a New Ticket
Start a new ticket in 3 places; in either of the blue New Ticket links or, for computer support, by clicking one of your saved assets in Quick Tickets section. An asset is any device that is assigned to you (computer, interactive board/panel, copier/printer).
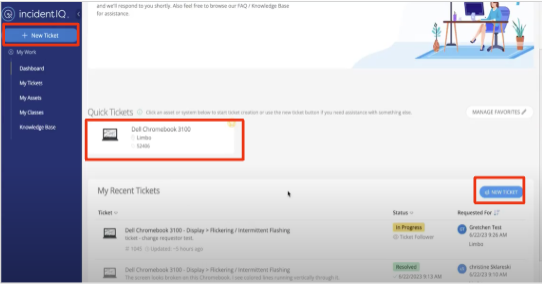
Figure 1. Press the blue button labeled "New Ticket" to open a ticket.
Select a Category
Select what the ticket is about. For example:
- Devices/Hardware if the ticket is about a computer, copier/printer or desk phone.
- Facilities if this is a work order
- Event Reservations to reserve a room/space in the district
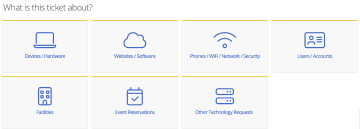
Figure 2. Select a category in IncidentIQ. The ticket will then be assigned to the appropriate department and technician.
Technology Tickets
To begin a Technology ticket for a computer issue, enter the asset tag number, select a favorite asset OR select from all device categories to begin the ticket. There will then be a number of screens to refine your ticket down to the closest issue.
You will then describe the issue and any troubleshooting steps that you’ve taken in the field provided. Next, add a location, indicate whether private student info is attached, enter additional users and attach files.
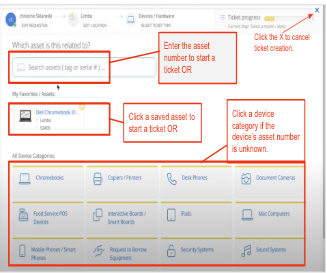
Figure 3. Choose a device or sub-category.
You will then describe the issue and any troubleshooting steps that you’ve taken in the field provided. Next, add a location, indicate whether private student info is attached, enter additional users and attach files.
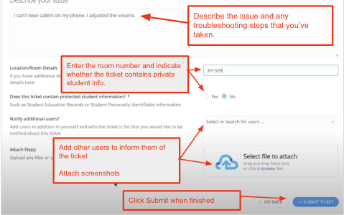
Figure 4. Describe the issue and troubleshooting steps before submitting the ticket.
Facilities Ticket
To submit a Facilities ticket, select a category and then sub-category describing the issue or search in the provided field. Choose Other Requests if the categories don’t apply.
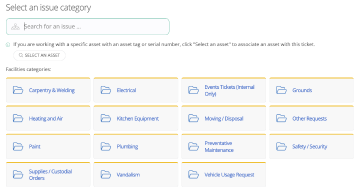
Figure 5. Select an IncidentIQ Facilities sub-category or search in the search box.
Describe the issue and any troubleshooting steps that you’ve taken in the field provided as shown in Figure 6. Next, add a location, enter additional users and attach files, if needed.
Once the ticket is submitted, an alert will appear at the top of the screen showing that the ticket was successfully submitted and an email notification will be sent to the district email account(s) associated with the ticket.
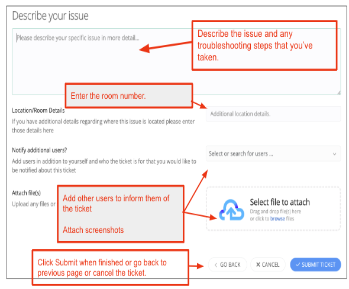
Figure 6. Describe the issue and enter required information before submitting the ticket.
Event Reservations
Enter the following information needed to reserve a room in EASD as shown in Figure 7:
- Enter Event Title (required)
- Enter Event Type (required)
- Other Event Details (optional fields): Number of Attendees, Setup and Breakdown Time
- Enter Start Date/Time and End Date/Time
- Click Continue
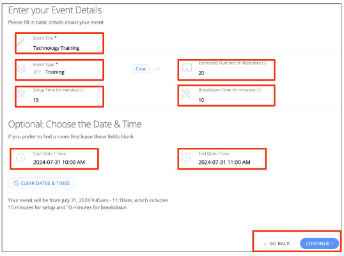
Figure 7. Enter information as required to reserve a space in EASD.
As shown in figure 8, click Location and select your building if the room in your building doesn’t display.
Scroll through rooms in the building or use the search field to quickly find a specific room.
Click on the room that you want to reserve and the selected room will appear at the bottom.
Click Continue.
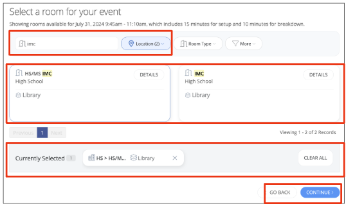
Figure 8. Through the room reservation form, click the location and select your building and room.
If you previously selected a date/time: confirm the date/time on the calendar.
If you did not select a date/time on the previous screen: The calendar for that room will appear starting at the current date. Arrow through to find available dates. Click directly on the calendar to select a time.
Click Continue.
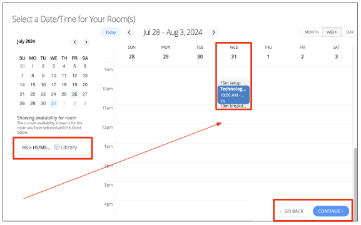
Figure 9. Select a date and time and click Continue.
- Add a Description
- Add Attachments (such as images showing room layouts)
- Additional Details request (as shown in Figure 10): Select any Technology services from the drop-down menu. Describe Facilities/Custodial services needed and whether Door Access will be required.
- Ignore organization information.
- Scroll down to click Submit
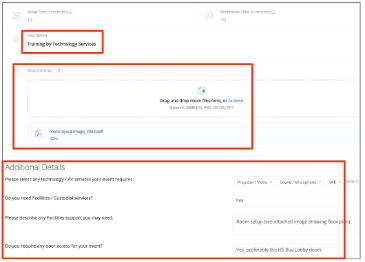
Figure 10. Describe the event and request technology and/or facilities support.
Below is a sample of the email notification that is sent when a room reservation ticket is submitted. Note that the sender is EASD Help Desk and the email address includes “etownschools.incidentiq.com”.
Click View ticket details to open IncidentIQ or reply through the email to add a note to the ticket.
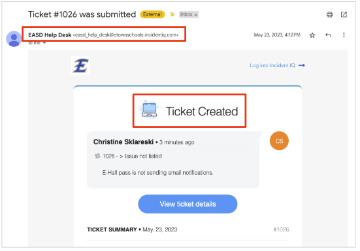
Figure 11. Email notification comes from EASD Help Desk.